...
...
For some of the more advanced Circulation Functions, Users may need to have assigned User Roles that grant additional permissions.
...
Advanced Hold Shelf Procedures
See Basics of Circulation > Requests and Recalls for details on how to view and fulfill hold requests, as well as how to place a request on a patron’s behalf.
| Expand |
|---|
| title | Deleting or Canceling a Hold Request |
|---|
|
Locate the request as described in Basics of Circulation > Requests and Recalls. Choose Cancel from the row action item list. Choose a Reason for the cancellation from the drop-down menu. Add a Note if more explanation is needed. The Notify User option is checked by default. (The user should generally always be notified so leave this box checked.) Click Confirm.
|
...
| title | Expired Hold Requests |
|---|
Expired Hold Requests
...
Alma sorts items on the Expired Hold Shelf into four tabs:
Reshelve
Send to Circulation Desk (at the same library)
Send to Library (at a different library)
Activate Next (next hold request in queue)
General Procedure
Confirm which items on the Expired Hold Shelf are genuinely expired by checking the date on the hold request slip.
Go to Fulfillment > Expired Hold Shelf.
On each tab (listed below), check all items you wish to perform the action to, and then click the link to the specified action (e.g., Activate Next) on the right side.
Best Practice: For the sake of accuracy it is better only to mark books on this screen that are in hand.
Physically route all items based on their destination.
Reshelve
Displays all expired requests for items belonging to the current circulation desk and for which there is no other request in the queue.
To reshelve an item, click the Reshelve button to the right.
To reshelve multiple items, select the check boxes of the relevant items and click Reshelve above.
Send to Circulation Desk
Lists all requests for items belonging to a different circulation desk in the same library, or that are requested for pickup at another desk within the same library.
None of our libraries have more than one circulation desk, so this tab should not be used.
Send to Library
Lists all requests for items belonging to a different library, or that are requested for pickup at another library.
To send an item to another library, click the Transit button to the right.
To send multiple items, select the check boxes of the relevant items and click Transit above.
The Fulfillment Transit Slip Letter (letter code: FulTransitSlipLetter) is printed and the item is put In Transit.
Activate Next
Activates the next request in the queue, which cancels the first request and makes the item available to the next requester.
This contains items that are currently on the hold shelf but have expired.
Use Return Items to check in books. This will route them and remove them from the expired hold shelf.
Physically route all items based on their destination.
For some of the more advanced Circulation Functions, Users may need to have assigned User Roles that grant additional permissions. If you need these additional permissions but do not have them, please speak with your supervisor.
| Table of Contents |
|---|
| maxLevel | 6 |
|---|
| minLevel | 1 |
|---|
| include | |
|---|
| outline | false |
|---|
| indent | |
|---|
| exclude | |
|---|
| style | none |
|---|
| type | list |
|---|
| printable | false |
|---|
| class | |
|---|
|
Advanced Hold Shelf Procedures
See Basics of Circulation > Requests and Recalls for details on how to view and fulfill hold requests, as well as how to place a request on a patron’s behalf.
| Expand |
|---|
| title | Deleting or Canceling a Hold Request |
|---|
|
Locate the request as described in Basics of Circulation > Requests and Recalls. Choose Cancel from the row action item list. Choose a Reason for the cancellation from the drop-down menu. Add a Note if more explanation is needed. The Notify User option is checked by default. (The user should generally always be notified so leave this box checked.) Click Confirm.
|
| Expand |
|---|
| title | Expired Hold Requests |
|---|
|
Expired Hold RequestsTheExpired Hold Shelf lists items on the hold shelf at your location that haven’t been picked up by the person who originally requested them. General Procedure Confirm which items on the Expired Hold Shelf are genuinely expired by checking the date on the hold request slip. Go to Fulfillment > Expired Hold Shelf. On each tab (listed below), check all items you wish to perform the action to, and then click the link to the specified action (e.g., Activate Next) on the right side. Best Practice: For the sake of accuracy it is better only to mark books on this screen that are in hand. Physically route all items based on their destination.
Reshelve Displays all expired requests for items belonging to the current circulation desk and for which there is no other request in the queue. To reshelve an item, click the Reshelve button to the right. To reshelve multiple items, select the check boxes of the relevant items and click Reshelve above.
Send to Circulation Desk Lists all requests for items belonging to a different circulation desk in the same library, or that are requested for pickup at another desk within the same library. None of our libraries have more than one circulation desk, so this tab should not be used. Send to Library Lists all requests for items belonging to a different library, or that are requested for pickup at another library. To send an item to another library, click the Transit button to the right. To send multiple items, select the check boxes of the relevant items and click Transit above. The Fulfillment Transit Slip Letter (letter code: FulTransitSlipLetter) is printed and the item is put In Transit.
Activate Next Activates the next request in the queue, which cancels the first request and makes the item available to the next requester. This contains items that are currently on the hold shelf but have expired. Use Return Items to check in books. This will route them and remove them from the expired hold shelf. Physically route all items based on their destination.
|
| Expand |
|---|
| title | Extending Hold Request Expiration Dates |
|---|
|
Alma will automatically expire hold requests not picked up within the designated time frame. If a patron asks for additional time to pick up the item, or in case of a library staff error, you can update the Expiry Date to allow for more time. Search Requests in the persistent search bar for item, title, or patron information. From the item record, click the row action item list icon […] and choose Update Expiry.
 Image Added Image Added |
| Expand |
|---|
|
When a patron claims to have returned an item previously, but it’s still on their record, you can mark the item as Claimed Returned. Go to Fulfillment > Manage Patron Services. Search for the patron by typing their name, their NetID, or scanning their DukeCard. On the Loans tab (the default), change the Loan Display drop-down to All Loans. Find the item in the list. Click the row action item list icon […] and select Claimed Return. Click OK to complete.
 Image Added Image AddedNote: it is not possible to mark an item Claimed Returned once it has been marked as Lost. |
| Expand |
|---|
| title | Undoing Claimed Return or Lost |
|---|
|
Undoing Claimed Return or Lost Go to Fulfillment > Manage Patron Services. Search for the patron by typing their name, their NetID, or scanning their DukeCard. On the Loans tab (the default), change the Loan Display drop-down to All Loans. Find the item in the list. Click the row action item list icon […] and select Claimed Return. Click OK to complete.
Image RemovedNote: it is not possible to mark an item Claimed Returned once it has been marked as Lost. |
| Expand |
|---|
| title | Undoing Claimed Return or Lost |
|---|
|
Undoing Claimed Return or Lost Go to Fulfillment > Manage Patron Services. Search for the patron by typing their name, their NetID, or scanning their DukeCard. On the Loans tab (the default), change the Loan Display drop-down to All Loans. Find the item in the list, their NetID, or scanning their DukeCard. On the Loans tab (the default), change the Loan Display drop-down to All Loans. Find the item in the list. Click the row action item list icon […] and select Found. Click OK to complete.
 Image Added Image AddedMarking a Claimed Returned item as Found checks the item back out to the patron and refunds any Lost item replacement fee but does not automatically refund the Lost Item process fee. The item still needs to be discharged from the patron’s account, if it was found in the stacks. |
See Viewing an Item Record for how to search for and view items.
Note: Permissions to manage and make edits to items will be dependent on the User Role.
| Expand |
|---|
|
DUL’s full lost/missing process is documented here, including workflows: Lost and Missing Items MissingTo mark a Requested item Missing: Search for the item using Requests in the Persistent Search Bar, or go to Fulfillment -> Monitor Requests & Item Processes and identify the item. Click the row action item list icon […] and select Found. Click OK to complete.
Image Removed |
See Viewing an Item Record for how to search for and view items.
Note: Permissions to manage and make edits to items will be dependent on the User Role.
| Expand |
|---|
|
DUL’s lost/missing process is documented here: Lost and Missing Items select Mark as Missing. This should move the Hold Request to the next available item or mark the hold unfilled, if there are no other possible items. The Process Type column for your item now displays Missing.
To mark an item Missing that has not been requested (i.e. not found on shelf during an inventory check): To update an item’s Missing Status, search for the item. Find the item to be marked missing, click on the row action item list icon […], and select Toggle Missing Status. The Process Type column for your item now displays Missing.
LostLong overdue items will automatically go to Lost after 28 days (as was the case in Aleph). When a patron reports an item currently on loan to their account as lost, stolen, or otherwise unreturnable, you can also manually mark the item as Lost. Go to Fulfillment > Manage Patron Services. Search for the patron by typing their name, their NetID, or scanning their DukeCard. On the Loans tab (the default), change the Loan Display drop-down to All Loans. Find the item in the list. Click . On the Loans tab (the default), change the Loan Display drop-down to All Loans. Find the item in the list. Click the row action item list icon […] and select Lost. Click OK to complete.
 Image Added Image Added |
| Expand |
|---|
|
Update a BarcodeUpdate a BarcodeTo update an item’s barcode, search for the item. From the correct item line, select Items. To edit item details, click the row action item list icon […] and select Edit. If there are multiple holdings, be sure to verify the barcode/library/location.  Image Removed Image RemovedEnter the new barcode and Save.
 Image Removed Image RemovedTo update an item’s barcode, search for the item. From the correct item line, select Items. To edit item details, click the row action item list icon […] and select Lost. Click OK to complete.
Image Removed |
| Expand |
|---|
|
Edit. If there are multiple holdings, be sure to verify the barcode/library/location. - Image Added
Enter the new barcode and Save.
Image Added |
| Expand |
|---|
| title | (DUL) Sending an item to Conservation |
|---|
|
(DUL) Sending an item to ConservationWe assume that you have the item in hand that needs repair. Search for the item in the Physical Items search For the item you are sending, click the row action item list icon […] and select Work order. From the next screen, select the process type of Acquisition technical services Since you have the item in hand, make sure Do not pick from shelf is checked. In the Note box, write “Damaged” with any other relevant information. Under Managing department, choose PERKN Acquisitions Department Click Submit Go to Fulfillment > Scan in items and scan the barcode a second time to put it in transit. Send the item to Conservation
|
| Expand |
|---|
| title | Changing item locations |
|---|
|
Change an Item’s Permanent Location| Note |
|---|
This changes the item’s holding record and should not be done by DUL fulfillment staff. Instead, a ticket should be sent to AskTech. |
For non-DUL libraries: To update an item’s location, search for the item. Select Items. To edit item details, click the row action item list icon […] and select Edit. If there are multiple holdings, be sure to verify the barcode/library/location. Scroll to the Location Information fields. Edit any necessary information and Save.
 |
| Expand |
|---|
|
Change an Item’s Temporary LocationAdding to Item Record To update an item’s temporary location, locate the item via a search. From the correct title line, click Expand All (double down arrow) to display all available holdings. Select Items. To edit item details, click the row action item list icon […] and select Edit. If there are multiple holdings, be sure to verify the barcode/library/location. Scroll to the Temporary Location Information fields. Enter any necessary information and Save.
 Temporary move requests Go to Fulfillment > Scan in items. Choose tab for Change Item Information.  Set the temporary location. Scan the item barcode.
|
Fines and Fees
Fines in Alma behave similarly to Aleph. Fines/Fees and Credits will continue to be transferred to the Bursar’s Office for student patrons, and can be paid by check or online payment for non-student patrons. https://duke.atlassian.net/wiki/x/AgA7Bw
...
A disputed fine or fee can be waived or restored. A waived fine or fee cannot be restored. Any fine or fee that has not been paid, waived, disputed, or exported to the Bursar has a status of Active.
Further information on advanced Fines and Fees functions can be found at https://duke.atlassian.net/wiki/x/JgEWCQ
| Expand |
|---|
|
Navigate to a patron’s User Details page (see Viewing a Patron Record). Click on the Fines/Fees tab. All Active fines/fees/credits will be displayed. To view Closed Fines/Fees, change the Status filter to All. This will display the patron’s full transaction historyall Fines/Fees, including Closed and Disputed, change the Status filter to All. This will display the patron’s full transaction history.
| Info |
|---|
Note that we do not expect to use the Transferred status. Fines that have been sent to the Bursar will display as Closed but will have additional data in the Bursar Transaction ID column. Please ensure that you have activated that column (using the Gear icon). |
|
| Expand |
|---|
|
Navigate to a patron’s User Details page (see Viewing a Patron Record). Click on the Fines/Fees tab. Click Add Fine or Fee on the right side of the screen. Select a Fee Type from the drop-down, enter the fee amount, and item barcode associated with the fee. Add a Comment if needed. Click Add to add another fine or fee, or Add and Close to complete.
|
...
| Expand |
|---|
|
Note: Patron must have an active balance greater than $0.00 for a library to accept payment for fines/fees. Go to Fulfillment >> Manage Patron Services. Search for the patron by typing their name, their NetID, or scanning their DukeCard. Click Pay button next to patron’s Active Balance. Identify the fines or fees to be paid: Choose Payment method (online, check). Click Send. Patron will receive an email receipt.
|
| Expand |
|---|
|
To waive a single Active Fine or Fee In the Fines/Fees tab, select the fine/fee you want to waive and select Waive Selected in the table actions list. Alternately, select Waive in the row actions list […] for the fine/fee that you want to waive. The Waiving Fine/Fee page appears: 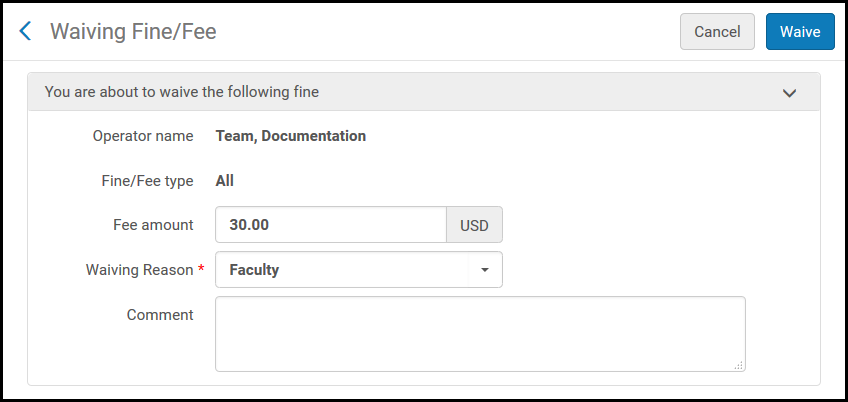 Enter the amount of the fee you want to waive in the Fee amount field. This allows for both full and partial waives. In Waiving reason select a reason for waiving the fee. Enter any additional information for waiving the fine or fee in the Comment field. Select Waive and select Confirm in the confirmation dialog box. The amount that is waived is deducted from the amount of the fine/fee (in the Original Amount column), and the balance owed for the fine/fee in the Remaining Balance column is reduced. The balances shown in the Fines and Fees Summary area are updated. To view the transactions for any fine or fee, select the amount link in the Remaining Balance column.
To Waive Multiple Active Fines or Fees for the Same Reason Fines/fees on multiple items can be batch waived, if they are being waived for the same reason (such as loss due to a natural disaster). In the Fines/Fees tab, click the check box to the left of one or more fines or fees. Click on Waive selected at the top right of the list. Choose the overall amount to waive, as with a single item.  the list. the list. Choose the Waiving Reason and add a Comment with the reason for waiving the fines. The reason and the comment will be the same for all fines waived together in this batch. Click Waive, then click Confirm to complete.
|
Patron Blocks
| Expand |
|---|
| title | Creating patron blocks |
|---|
|
Navigate to a patron’s User Details page (see Viewing a Patron Record). Click on the Blocks tab. Click Add Block on the right side of the screen. Select Block Type from the drop-down. Enter an Expiry Date, if applicable. Add a Comment in the Note field with explanation for the block. Click Add and Close to complete, or Add to if additional blocks need to be applied to the same user record.
Manually created blocks will persist until edited or deleted, unless given an Expiry Date. Automatic blocks will clear when the reason for the block is resolved (ie, a lost item is returned). |
| Expand |
|---|
| title | Removing patron blocks |
|---|
|
Navigate to a patron’s User Details page (see Viewing a Patron Record). Click on the Blocks tab. Locate the Block to cancel and click the ellipses on the right side of the screen. Select Delete from the dropdown menu.
|
User Management
Most users will be External, meaning that they and their relevant information are automatically loaded through Duke’s Identity Management service. Internal users are manually created within the Alma environment. See https://duke.atlassian.net/wiki/x/noP1Bg
Only some fields in External users' records will be editable; those that are not will be greyed out in the User Management view.
For the basics on viewing patron records, see Viewing a Patron Record.
| Expand |
|---|
| title | Editing an existing patron record |
|---|
|
Note that several fields for External users will be overwritten by the daily feed from Duke Identity Management, even if changed within Alma. Go to Fulfillment > Manage Patron Services (see Viewing a Patron Record) Search for the patron by typing their name, their NetID, or scanning their DukeCard. Click Edit User Info on the bar at the top of the screen. Edit the necessary details. Click Update User on the top right corner of the screen.Sa
|
| Expand |
|---|
| title | Creating new patron record |
|---|
|
This process will be used to create manual Internal patrons (e.g. Alumni, TRLN, Friends of the Library) Go to Fulfillment > Manage Patron Services Click Register New User on the right side of the screen. Enter Patron information. Required categories include: First Name and Last Name Primary Identifier (NetID for those who have one, such as Visiting Scholars; UniqueID for anyone using OneLink, such as alumni) User Group Email Address and Email Type
Click Update User on the top right corner of the screen.
|
...
| title | Adding notes to patron record |
|---|
...
/noP1Bg
Only some fields in External users' records will be editable; those that are not will be greyed out in the User Management view.
For the basics on viewing patron records, see Viewing a Patron Record.
| Expand |
|---|
| title | Editing an existing patron record |
|---|
|
Editing an existing patron recordNote that several fields for External users will be overwritten by the daily feed from Duke Identity Management, even if changed within Alma. Go to Fulfillment > Manage Patron Services (see Viewing a Patron Record) Search for the patron by typing their name, their NetID, or scanning their DukeCard. Click Edit User Info on the bar at the top of the screen. Edit the necessary details. Click Update User on the top right corner of the screen.Sa
|
| Expand |
|---|
| title | Creating a new patron record |
|---|
|
Creating a new patron recordThis process will be used to create manual Internal patrons (e.g. Alumni, TRLN, Friends of the Library) Go to Fulfillment > Manage Patron Services Click Register New User on the right side of the screen. Enter Patron information. Required categories include: First Name and Last Name Primary Identifier (NetID for those who have one, such as Visiting Scholars; UniqueID for anyone using OneLink, such as alumni) User Group Email Address and Email Type
Click Update User on the top right corner of the screen.
|
| Expand |
|---|
| title | Adding notes to patron record |
|---|
|
Adding notes to a patron recordUser notes will appear in the right-hand sidebar on the Patron Services page (user record) or at the top, depending on your screen width. Some user notes will be generated through the system. Other informational notes can be added manually. Navigate to a patron’s User Details page (see Viewing a Patron Record). Click on the Notes tab. Click Add Note on the right side of the screen. Type the note in the Text Box. Select Type from the dropdown menu. Choose Pop up note if this note should appear at circulation interactions. To complete either click Add, to continue adding notes,or Add and Close if you are finished.
|
| Expand |
|---|
| title | Updating a patron's preferred name |
|---|
|
Updating a patron’s preferred nameOccasionally, a patron may ask to list a different first name than the one that is loaded into Alma from identity management. As of Fall 2024, we do not automatically load preferred names from Identity Management, so the patron’s Alma account must be updated manually. Inform the user of the OIT page that allows them to add a preferred name to their university directory listing - https://idms-web-selfservice.oit.duke.edu/. Let them know that you can add their name manually today, but they should also list it with the university directory. Make sure to stress that if they do not list it with the directory, when we begin to load preferred names automatically, the change you make today will be overwritten. Navigate to a patron’s User Details page (see Viewing a Patron Record). Click on On the Notes tab. Click Add Note on the right side of the screen. Type the note in the Text Box. Select Type from the dropdown menu. Choose Pop up note if this note should appear at circulation interactions. To complete either click Add, to continue adding notes,or Add and Close if you are finished. general information tab, type the user’s preferred first name in the Preferred first name box. Click Save to save their user record.
From that point forward, notices will reference their preferred first name, and they will appear with the preferred first name in Alma when staff look at their records. |