For some of the more advanced Circulation Functions, Users may need to have assigned User Roles that grant additional permissions.
Advanced Hold Shelf Procedures
See Basics of Circulation > Requests and Recalls for details on how to view and fulfill hold requests, as well as how to place a request on a patron’s behalf.
Claimed Returned
When a patron claims to have returned an item previously, but it’s still on their record, you can mark the item as Claimed Returned.
Go to Fulfillment > Manage Patron Services.
Search for the patron by typing their name, their NetID, or scanning their DukeCard.
On the Loans tab (the default), change the Loan Display drop-down to All Loans.
Find the item in the list.
Click the row action item list icon […] and select Claimed Return.
Click OK to complete.

The Loan Status column will now display Claim Returned.
Note: it is not possible to mark an item Claimed Returned once it has been marked as Lost.
Undoing Claimed Return or Lost
Go to Fulfillment > Manage Patron Services.
Search for the patron by typing their name, their NetID, or scanning their DukeCard.
On the Loans tab (the default), change the Loan Display drop-down to All Loans.
Find the item in the list.
Click the row action item list icon […] and select Found.
Click OK to complete.

Marking a Claimed Returned item as Found checks the item back out to the patron and refunds any Lost item replacement fee but does not automatically refund the Lost Item process fee. The item still needs to be discharged from the patron’s account, if it was found in the stacks.
Managing items
See Viewing an Item Record for how to search for and view items.
Note: Permissions to manage and make edits to items will be dependent on the User Role.
Marking Items Missing/Lost
DUL’s lost/missing process is documented here: Lost and Missing Items
Long overdue items will automatically go to Lost after 28 days (as was the case in Aleph).
When a patron reports an item currently on loan to their account as lost, stolen, or otherwise unreturnable, you can also manually mark the item as Lost.
Go to Fulfillment > Manage Patron Services.
Search for the patron by typing their name, their NetID, or scanning their DukeCard.
On the Loans tab (the default), change the Loan Display drop-down to All Loans.
Find the item in the list.
Click the row action item list icon […] and select Lost.
Click OK to complete.

Update a Barcode
To update an item’s barcode, search for the item.
From the correct item line, select Items.
To edit item details, click the row action item list icon […] and select Edit. If there are multiple holdings, be sure to verify the barcode/library/location.

Enter the new barcode and Save.

Change an Item’s Permanent Location
To update an item’s location, search for the item.
Select Items.
To edit item details, click the row action item list icon […] and select Edit. If there are multiple holdings, be sure to verify the barcode/library/location.
Scroll to the Location Information fields.
Edit any necessary information and Save.

Change an Item’s Temporary Location
Adding to Item Record
To update an item’s temporary location, locate the item via a search.
From the correct title line, click Expand All (double down arrow) to display all available holdings.
Select Items.
To edit item details, click the row action item list icon […] and select Edit. If there are multiple holdings, be sure to verify the barcode/library/location.
Scroll to the Temporary Location Information fields.
Enter any necessary information and Save.

Temporary move requests
Go to Fulfillment > Scan in items.
Choose tab for Change Item Information.

Set the temporary location.
Scan the item barcode.
Fines and Fees
Fines in Alma behave similarly to Aleph. Fines/Fees and Credits will continue to be transferred to the Bursar’s Office for student patrons, and can be paid by check or online payment for non-student patrons. https://duke.atlassian.net/wiki/x/AgA7Bw
From the Fines/Fees tab of the User Details page, you can view a patron’s fines/fees; add or waive a fine or fee; indicate that a fine or fee is under dispute; and link the fine or fee to an item.
A disputed fine or fee can be waived or restored. A waived fine or fee cannot be restored. Any fine or fee that has not been paid, waived, disputed, or exported to the Bursar has a status of Active.
To waive a single Active Fine or Fee
In the Fines/Fees tab, select the fine/fee you want to waive and select Waive Selected in the table actions list. Alternately, select Waive in the row actions list […] for the fine/fee that you want to waive. The Waiving Fine/Fee page appears:
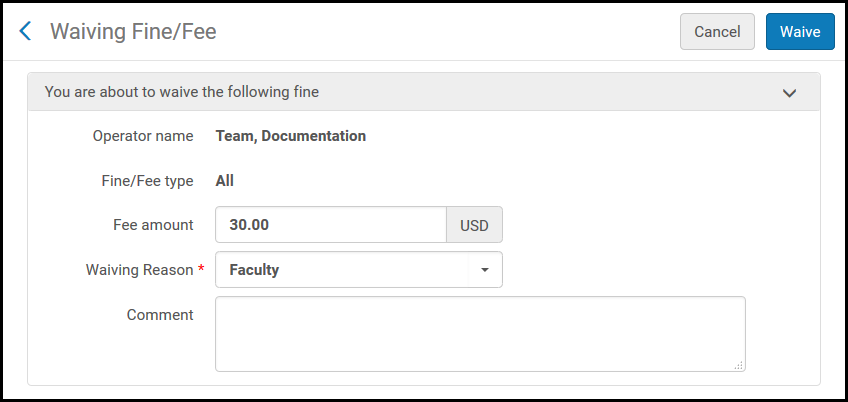
Enter the amount of the fee you want to waive in the Fee amount field. This allows for both full and partial waives.
In Waiving reason select a reason for waiving the fee.
Enter any additional information for waiving the fine or fee in the Comment field.
Select Waive and select Confirm in the confirmation dialog box. The amount that is waived is deducted from the amount of the fine/fee (in the Original Amount column), and the balance owed for the fine/fee in the Remaining Balance column is reduced. The balances shown in the Fines and Fees Summary area are updated.
To view the transactions for any fine or fee, select the amount link in the Remaining Balance column.
To Waive Multiple Active Fines or Fees for the Same Reason
Fines/fees on multiple items can be batch waived, if they are being waived for the same reason (such as loss due to a natural disaster).
In the Fines/Fees tab, click the check box to the left of one or more fines or fees.
You can select all fines and fees by clicking the check box in the blue bar at the top of the column. You can then de-select any unrelated fees (such as a late recall fine if you're waiving lost materials fines) by clicking the box next to that one item.
Click on Waive selected at the top right of the list.
Choose the Waiving Reason and add a Comment with the reason for waiving the fines. The reason and the comment will be the same for all fines waived together in this batch.
Click Waive, then click Confirm to complete.
Patron Blocks
User Management
Most users will be External, meaning that they and their relevant information are automatically loaded through Duke’s Identity Management service. Internal users are manually created within the Alma environment. See https://duke.atlassian.net/wiki/x/noP1Bg
Only some fields in External users' records will be editable; those that are not will be greyed out in the User Management view.
For the basics on viewing patron records, see Viewing a Patron Record.