Basics of Fulfillment
In Alma, Fulfillment refers to circulation desk activities, such as loans, returns, renewals, holds, and more.
In depth information about fulfillment tasks can be found via ExLibris documentation on Managing Patron Services at a Circulation Desk
Viewing a Patron Record
Navigate to Fulfillment > Checkout/Checkin > Manage Patron Services.
Bring up the patron record by having the patron tap their DukeCard; scanning their DukeCard; or searching by typing their name or NetID.
You’ll see a snapshot of their current status and any user notes in the right sidebar, and tabs for Loans, Returns, and Requests down below.

The Patron Services Page displays the following core patron information: Patron Name, ID (NetID), User Group, Active balance, Notes, Number of items of the Hold Shelf, Overdue Items.
A small, folded blue corner indicates that a tab has content.
Patron Services
From the Patron Services page, you can manage loans, renewals, and item requests.
Loaning
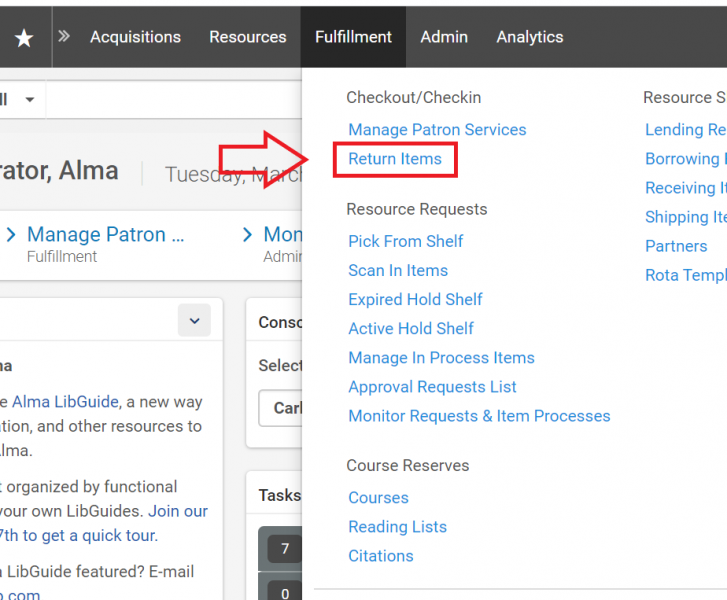
Returning
Note: the process for returning borrowed items and processing in items arriving when requested from other libaries is separate.
Navigate to Fulfillment > Return Items.
The Manage Item Returns screen will open and you can then scan or enter items to be returned.

This is the primary method of scanning in items returned or sent to a library location.
To scan arrived items in (e.g. those items that have been routed from another library department), navigate to Fulfillment > Resource Requests > Scan in Items.
Note: this will not discharge the item; it will only change its work order type. More information to come.
This may also be used for the purposes of tracking in-house use of an item.

When items belong to another library on campus, an Item Destination window will appear at return or scanning items in.

Print dialog boxes appear when slips are needed for items. Of note: be sure to select the 'Enable Quick Print” option in the header dropdown to allow slips to appear in the browser and be sent to a designated printer.

Renewing and Changing Due Dates
Renewal limits in Alma are calculated based on a length of time rather than the number of renewals. For example, if an item is loaned for seven days and two renewals are allowed, Alma enforces that renewal by allowing a 21-day overall use period for the item.
Item Records - Viewing and Searching
Use the persistent search bar to conduct either a Physical Titles or Physical Items search. Each has its uses and advantages.
A Physical Titles search gives you a quick view of the physical item’s availbility, but requires additional clicking through Items to get information about location, barcode, and more detailed information.
A Physical Items search gives a more immediately detailed view, including barcode, process, status, etc.
Choose search criteria (Title, Keywords, or whatever information you have), and type in your search term and click the search icon.
The results will show all item records matching your search.

Searching by call number
To search for a physical print item by call number, you can use a number of search criteria from the dropdown menu as described above, such as Keywords, LC Call Number, and others.
To search for a physical A/V item, like a CD or DVD that is catalogued by accession number (ie, DVD 101), you’ll need to use the search criteria Permanent Call Number to retrieve any results.
Remember that clicking on an item’s title from the search will bring up the MARC record screen, which probably isn’t what you’re looking for!
Viewing Item Details
Remember: Clicking the title itself will display the MARC record view, NOT the item record.
A Physical Items search will display many of the item details immediately, including barcode, call number, owning library, status, hold and/or loan information, item policy, and material type.

From a Physical Titles search, click Expand All (double down arrows) to display all items available. In the screenshot below, the green dot indicates that there is at least one physical copy availabile.

Select Items.

When in this items view, you can customize the order of the columns by selecting a column and dragging it to the preferred location. You can also change the width of the columns.
To access details from hidden columns within Items, click the row action item list icon […] and select View hidden.
In any of these views, you can click the Gear icon to customize which columns are shown.
 The advanced search feature supports a more powerful, refined search, including multiple search fields and values.
The search starts with a single row. Each row contains a search field drop-down list, a search criteria text selection list, and a search box.
To add additional rows, select the duplicate row icon or add row icon.
Each row can be configured either to match criteria by either AND or OR by toggling the switch on each row.
To remove a row (other than the first), select the delete row icon.
Results can still be further refined using facets or filters.
Requests and Recalls
Hold requests and recalls in Alma are mostly handled at the title level instead of item level. This means that Alma will automatically put the hold on the nearest available copy. If there is information in the item description field, such as a volume number, then the request will be handled at item level instead. Staff can also submit requests at the item level (see “Requesting a Specific Item” below).
If all items for a title are on loan, Alma will recall the item that has been loaned for the longest period of time.
Fulfilling patron physical item hold requests
There are many ways to search for both Active and Completed patron hold requests. For batch pulling of hold requests, Alma creates a Pick List which contains hold requests that have not yet been filled.
Depending on the information you have or where you're starting from, there are several ways to look up and view a current request:
Search by Requester
Go to Fulfillment > Manage Patron Services.
Search for the patron by typing their name, their NetID, or scanning their DukeCard.
Select the Requests tab to see holds requests for a given patron.
Search by Title
Search for the title in the persistent search bar (either All Titles or Physical Titles search types).
If a title has requests, they will appear as a number next to Requests in the results record.

Click on the number to see the request queue.
Search by Request ID
We do not recommend using this feature in Alma. The Request ID number only displays once, in the confirmation box when the hold request is initially placed, and does not persist unless written down or copied manually.
If you do have the Request ID number, use the search type Requests, the criteria Request ID, and enter the ID number.
Use the Monitor Requests and Item Processes List
Go to Fulfillment > Monitor Requests and Item Processes.
Use the Facets to sort and limit the list of all requests, such as by Process Type, Pickup Location, Material Type, Workflow Step, Request Date, Owning Library, and more.
To view only Duke patron requests that are Active, filter to Activity Status: Active and Include Pending Resource Sharing Requests: No.
You can also view previously Completed hold requests from this list.
Go to Fulfillment > Pick from Shelf
Use the Facets on the left to limit the pick list (to a call number range, to be sent to the same destination, for the same request or material type, etc.)
Click Print Slip Report. The dialog box gives you three choices:
To print the results, click the Printer button, select the specific printer, then click Send.
To download the results, choose the preferred output format (XML or Excel) and click Download.
To email the list to someone, select User at the top, select a user, and click Send.
Note: the user you are sending to must be part of the "include" list for that specific Pick List.
Do not choose XML when sending to a user.

Using your printed lists, pull the items from the stacks and return to the desk.
Go to Fulfillment > Return items.
Scan the barcode of each item(s) physically pulled.
Proceed according to local workflows to transfer materials or to place on hold shelves.
Confirm the items are Missing, that is, they were not found in the stacks, reshelving, etc.
Go to Fulfillment > Pick from Shelf.
Locate the first missing request/title by scrolling or searching the pick list and/or using the facets on the left to limit what's being viewed.
On the item's record, click on Mark as Missing (if not visible, click on the row action item list icon […] and choose Mark as Missing).
Note: You will be prompted that it will mark the entire holding as missing, but this will only mark the items on that holding as missing, not the holdings at all Duke Libraries combined.
The hold request now moves to the holding at the next available Duke library, if any. If there are none, the patron will receive an email informing them the request was not filled.

Placing patron physical item hold requests
Note: patron requests are title-level if there is nothing in the item description field. If there is something in the item description field, i.e. volume or copy numbers, the request will move to item-level.
Search for the title using All Titles or Physical Titles search types, the Title search criteria, and the title. You can also use other criteria and terms as appropriate.
Click the row action list icon […] next to the requested title and choose Request.
In the Request type field, select Patron physical item request.
Scan or manually type patron ID number into the Requester field. Make sure to select the user. You should see their “lastname, firstname” in the field before continuing.
Add any special instructions or comments about the request in the Notes field.
Select the Pickup At location.
Note: No locations will appear if there are errors in entered fields above.
The Additional Request Attributes are optional.
Click Submit to place the request.
A green check message box at the top of the page confirms the request.
Hold requests can be verified from a patron’s Patron Services page, under Requests.
If a title has multiple volumes, see “Requesting a Specific Item for a Patron” below.


Best practice is to make title-level requests, to offer the best chance of the request being filled quickly, but it is possible to place item-level requests for specific issues or volumes, or a unique copy of a more common work (one with marginalia, for instance).
To request a specific item:
Search for the item using the Physical Items search type, the Title search criteria, and the title. You can also use other criteria and terms as appropriate.
Click Items to view the List of Items for the requested title.
Click on the row action list icon […] for the requested volume or copy and select Request.
In the Request type field, select Patron physical item request.
Scan or manually type patron ID number into the Requester field. Make sure to select the user. You should see their “lastname, firstname” in the field before continuing.
Add any special instructions or comments about the request in the Notes field.
Select the Pickup At location.
Note: No locations will appear if there are errors in entered fields above.
The Additional Request Attributes are optional.
Click Submit to place the request.
A green check message box at the top of the page confirms the request.
Hold requests can be verified from a patron’s Patron Services page, under Requests.
Alternatively, you can place requests from the title record by following the above directions (“Requesting a title for a patron”) and choosing the requested volume or copy in the Description drop-down field.

Notices and Letters
Notices (letters) will be sent by email to patrons automatically, such as overdue and courtesy notices, but can also be sent manually by library staff.
Go to Fulfillment > Manage Patron Services
Search for the patron by typing their name, their NetID, or scanning their DukeCard.
Click Send Activity Report. The patron will receive an email including current and overdue loans from each library.

Previously sent Notices can also be viewed from a patron’s record. They will be retained for a certain period of time.
Navigate to a patron’s User Details page (see Viewing a Patron Record).
Select Attachments from the upper tabs.
Both automatic Alma-generated letters and manually created letters will be displayed. Manually created letters are identified in the Attached By column by the staff member’s NetID. Automatic notices will display as System.
Use the More actions button […] to View or Resend notification.
