This page is in draft - please ask Sarah Griffin if you have questions about what is listed here.
4/4/24
Please make any additions or edits in the Basics/Advanced “child” pages!
(Other than Welcome to → User Roles, which will stay on this page)
--- DRAFT ---
Proposed page structure:
Welcome to Alma Fulfillment
Fulfillment Terminology
The Alma Home Page
User Roles
Circulation Basics
Viewing a Patron Record
Loans, Returns, and Renewals
Managing holds (pick lists)
Viewing, Modifying Requests
Creating Hold Requests and Recalls
Notices and Printing
Advanced Circulation
Cancelling Hold Requests
Missing/Lost/Claimed Returned
Fines and Patron Blocks
User Management
Managing Items
Specialized Circulation Processes
Courses and Leganto (simple link to Course Reserves page)
InterLibrary Loan (Resource Sharing)
Analytics
Sets and Jobs
TO-DO Leave this as landing page info here, not separate child page - add TOC
Welcome to Alma
Alma Essentials: https://knowledge.exlibrisgroup.com/Alma/Training/AlmaEssentials/Alma_Essentials_-_English
Alma Glossary: https://knowledge.exlibrisgroup.com/Alma/Product_Documentation/010Alma_Online_Help_(English)/010Getting_Started/085_Alma_Glossary
Alma login: https://duke.alma.exlibrisgroup.com/SAML
Fulfillment Terminology
What is Fulfillment? The process by which patrons borrow and return physical resources, or access electronic or digital resources. Fulfillment includes all areas where requests for items are created and filled. Tasks include viewing the status of an item, checking out and checking in materials, placing holds, adjusting loan periods, adding new patrons or editing existing patrons, renewing materials, managing fines, and sending notices to patrons.
Circulation desks: Work locations in the library that handle patron fulfillment. Users will set their location in the persistent menu (upper right corner) so that materials are checked out and returned properly.

Fulfillment units: Shelving locations with similar lending or return policies and blocks
Institutions: An institution is the highest part of the hierarchy. At Duke, we have one institution.
Libraries: The individual libraries on a campus. Each library is uniquely identified in Alma so the specific needs of that library can be addressed. For example, Ford and Perkins are each Alma libraries.
 Work orders versus IPS (Alma different) - still TBD?
The Alma Home Page
The Alma home page is the initial page that appears when you log in to Alma. You return to the Alma home page when you select the Duke logo in the persistent menu or when you cancel certain actions in Alma.

The specific elements that display on the Alma home page and menu options depend on your user roles. However, the home page always presents:
Persistent Menu: every page contains this header that includes the Duke logo, a search box, and main menu icons.
Navigation Bar: the main menu to navigate in Alma, located in the left sidebar. This is where you’ll find the Fulfillment unit.
Recent Pages Widget: Displays the pages you have most recently visited. Select to go directly to one of the pages.
Additional features you can enable:
Widgets and Manage Widgets Button: Widgets are small panes of information or actions that are relevant to your user role. You can choose to display or remove widgets (except for the Recent Pages widget) from the Manage Widgets button.
Quick Links: Alma tools that you use frequently can be set as Quick Links, so you don’t have to go through the sub-menus every time. Click the desired option in any module; when the star turns blue, it is set as a Quick Link. To create Quick Links: Select
 on the Navigation panel and select Pin Quick Links Menu to display. For more information, see: https://knowledge.exlibrisgroup.com/Alma/Product_Documentation/010Alma_Online_Help_(English)/010Getting_Started/050Alma_User_Interface_%E2%80%93_General_Information/045Usability_Improvements/Layout_Improvements#Quick_Links_Improvements
User Roles
User Roles define what functions a user can perform in Alma. Each role confers a set of permissions, and staff members will have multiple roles assigned to them, depending on their job responsibilities.
Roles are specific to a library location (i.e., a Lilly staff member might have a “Circulation Desk Manager” role at Lilly but only a “Circulation Desk Operator” role at Music). Staff should always make sure they are logged in to the correct circulation desk location.
Some circulation-related roles in Alma have three tiers: Manager (with the highest level of permissions), Operator, and Operator – Limited. All users, staff and patrons, will have the role of Patron in Alma, which allows borrowing of materials. Other roles are related to Circulation Desk functions, Requests, Users, Inventory, Course Reserves, and more.
For detailed information on Alma User Role Profiles, Job Categories, and how those affect permissions, see Permissions and Role Management.
4/4/24 - Currently migrating Basics of Fulfillment to child pages - please do not edit further here!
Basics of Fulfillment
In depth information about fulfillment tasks can be found via ExLibris documentation on Managing Patron Services at a Circulation Desk
Viewing a Patron Record
Navigate to Fulfillment > Checkout/Checkin > Manage Patron Services.
Search for the patron by typing their name, their NetID, or scanning their DukeCard. This will bring up the patron record, with a snapshot of their current status and any user notes in the right sidebar, and tabs for Loans, Returns, and Requests down below.

The Patron Services Page displays the following core patron information: Patron Name, ID (NetID), User Group, Active balance, Notes, Number of items of the Hold Shelf, Overdue Items.
Patron Services
From the Patron Services page, you can manage loans, renewals, and item requests.
Loaning
Returning
Note: the process for returning borrowed items and processing in items arriving when requested from other libaries is separate.
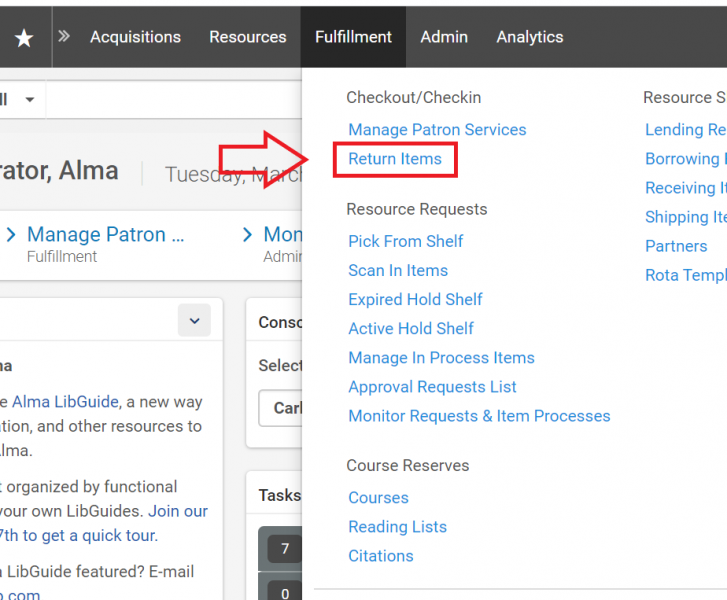
Navigate to Fulfillment > Return Items.
The Manage Item Returns screen will open and you can then scan or enter items to be returned.

To scan arrived items in (e.g. those items that have been routed from the same or a different library for a Hold Request), navigate to Fulfillment > Resource Requests > Scan in Items.
This may also be used for the purposes of tracking in-house use of an item.

Renewing and Changing Due Dates
Renewal limits in Alma are calculated based on a length of time rather than the number of renewals. For example, if an item is loaned for seven days and two renewals are allowed, Alma enforces that renewal by allowing a 21-day overall use period for the item.
Requests and Recalls
Item requests in Alma are mostly handled at the title level instead of item level. This means that Alma will automatically put the hold on the nearest available copy. If there is information in the item description field, such as a volume number, then the request will be handled at item level instead. Staff can also submit requests at the item level (see “Requesting a Specific Item” below).
If all items are on loan, Alma will recall the item that has been loaned for the longest period of time.
Hold Requests
Placing patron physical item requests
Note: patron requests are title-level if there is nothing in the item description field. If there is something in the item description field, i.e. volume or copy numbers, the request will move to item-level.
Fulfilling patron physical item requests
Alma creates a Pick List which contains the hold requests that have not yet been filled. There are also multiple ways of searching for both Active and Completed patron hold requests.
*screenshots to be added*
Depending on the information you have or where you're starting from, there are four ways to look up and view a current request:
Search by Request IDUse the search typeRequests, the criteriaRequest ID, and the ID number that was displayed in the confirmation box when the request was placed.Other criteria available for this search type:Requester(name)Identifier(requester NetID)Titleof the materialBarcodeof the item
Search by Title
Search for the title in the persistent search bar (either All Titles or Physical Titles search types).
If a title has requests, they will appear as a number next to Requests in the results record.

Click on the number to see the request queue.
Search by Requester
Go to Fulfillment > Manage Patron Services.
Search for the patron by typing their name, their NetID, or scanning their DukeCard.
Select the Requests tab to see holds requests for a given patron.
Use the Monitor Requests and Item Processes List
Go to Fulfillment > Monitor Requests and Item Processes.
Use the Facets to sort and limit the list of all requests, such as by Process Type, Pickup Location, Material Type, Workflow Step, Request Date, Owning Library, and more.
To view only Duke patron requests that are Active, filter to Activity Status: Active and Include Pending Resource Sharing Requests: No.
You can also view Completed hold requests here.
Still need to figure out if we’re including this info and, if so, where
Fulfillment units (buckets of locations where the circ rules live)
Fulfillment configuration utility - https://knowledge.exlibrisgroup.com/Alma/Product_Documentation/010Alma_Online_Help_(English)/030Fulfillment/070Advanced_Tools/010Loans/010Fulfillment_Configuration_Utility
Alma circulation behaves differently than Aleph circulation.
In Aleph, circulation is controlled by an item’s sub library, item status, process status and availability, along with the patron group.
In Alma, circulation is controlled primarily by the item’s location, which is grouped into “fulfillment units” that have the same set of rules. E.g., we have a fullfilment unit called “Standard Loan” that includes stacks locations and other general collections where we generally allow faculty to borrow for an academic year, undergrads to borrow for 28 days, and so on.
Definitions:
Fulfillment unit: “A fulfillment unit is one or more physical locations within an institution that follow the same policies.” (Ex Libris definition from here: https://knowledge.exlibrisgroup.com/Alma/Product_Documentation/010Alma_Online_Help_(English)/030Fulfillment/080Configuring_Fulfillment/020Fulfillment_Infrastructure/Configuring_Physical_Fulfillment )
Terms of use: “Terms of Use (TOU) are groups of policies that define loan and requesting behavior for patrons.” (Ex Libris definition from document above)
Showed up in another school’s training, and early users talked about this
Fulfillment configuration tool shows the terms of use – maybe that’s a place to introduce naming?
(ie, circulation rules)
*add exlibris link*
Managing Items has been moved to the Basics/Advanced child page - please edit there!
Managing items
Permissions to manage and make edits to items will be dependent on the user role. [insert link to Roles section]
Select/Verify current location
Go to Fulfillment > Manage Patron Services
Search for the patron by typing their name, their NetID, or scanning their DukeCard.
On the Loans tab (the default), change the Loan Display drop-down to All Loans
Find the item in the list
Click the row action item list icon (the ellipsis) and select Claimed Return
Click OK to complete

Undoing Claimed Return or Lost
Select/Verify current location
Go to Fulfillment > Manage Patron Services
Search for the patron by typing their name, their NetID, or scanning their DukeCard.
On the Loans tab (the default), change the Loan Display drop-down to All Loans
Find the item in the list
Click the row action item list icon (the ellipsis) and select Found
Click OK to complete

To update an item’s barcode, locate the item via a search.
Once located, click “expand all” to display all items available.
Select Items
To edit item details, click the row action item list icon (the ellipsis) and select Edit
Enter the new barcode and Save


To update an item’s barcode, locate the item via a search.
Once located, click “expand all” to display all items available
Select Items
To edit item details, click the row action item list icon (the ellipsis) and select Edit
Scroll to the Location Information fields
Edit any necessary information and Save

Temporary locations
Adding to Item Record
To update an item’s barcode, locate the item via a search.
Once located, click “expand all” to display all items available.
Select Items
To edit item details, click the row action item list icon (the ellipsis) and select Edit
Scroll to the Temporary Location Information fields
Enter any necessary information and Save

Temporary move requests
Go to Fulfillment > Scan in items
Choose tab for Change Item Information
Set the temporary location
Scan the item barcode
Marking Items Missing/Lost *screenshots to be added*
TBD
Fines has been migrated to Advanced child page - no further edits here please!
Fines
[placeholder:] Fines in Alma behave similarly to Aleph. ![]() Clarifying fine types – different language from Aleph Fines/Fees and Credits will continue to be transferred to the Bursar’s Office for student users.
Clarifying fine types – different language from Aleph Fines/Fees and Credits will continue to be transferred to the Bursar’s Office for student users.
From the Fines/Fees tab of the User Details page, you can view a patron’s fines/fees; add or waive a fine or fee; indicate that a fine or fee is under dispute; and link the fine or fee to an item.
A disputed fine or fee can be waived or restored. A waived fine or fee cannot be restored. Any fine or fee that has not been paid, waived, disputed, or exported to the Bursar has a status of Active.
To waive a single Active Fine or Fee
In the Fines/Fees tab, select the fine/fee you want to waive and select Waive Selected in the table actions list. Alternately, select Waive in the row actions list […] for the fine/fee that you want to waive. The Waiving Fine/Fee page appears:
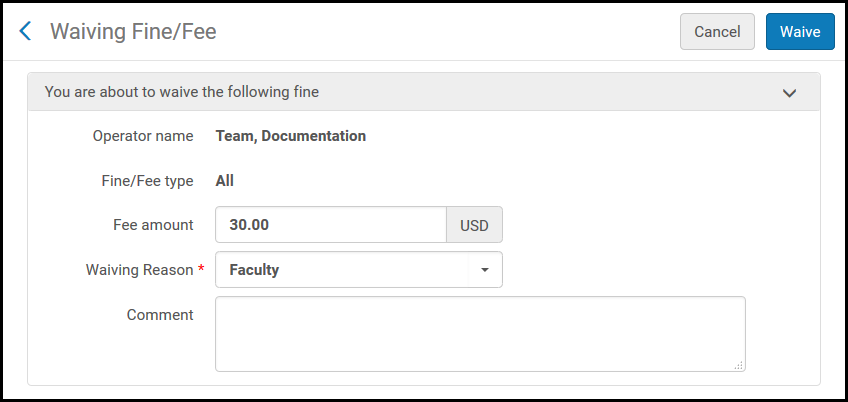
Enter the amount of the fee you want to waive in the Fee amount field. This allows for both full and partial waives.
In Waiving reason select a reason for waiving the fee.
Enter any additional information for waiving the fine or fee in the Comment field.
Select Waive and select Confirm in the confirmation dialog box. The amount that is waived is deducted from the amount of the fine/fee (in the Original Amount column), and the balance owed for the fine/fee in the Remaining Balance column is reduced. The balances shown in the Fines and Fees Summary area are updated.
To view the transactions for any fine or fee, select the amount link in the Remaining Balance column.
To Waive Multiple Active Fines or Fees for the Same Reason
Fines/fees on multiple items can be batch waived, if they are being waived for the same reason (such as loss due to a natural disaster).
In the Fines/Fees tab, click the check box to the left of one or more fines or fees.
You can select all fines and fees by clicking the check box in the blue bar at the top of the column. You can then de-select any unrelated fees (such as a late recall fine if you're waiving lost materials fines) by clicking the box next to that one item.
Click on Waive selected at the top right of the list.
Choose the overall amount to waive, as with a single item.

Choose the Waiving Reason and add a Comment with the reason for waiving the fines. The reason and the comment will be the same for all fines waived together in this batch.
Click Waive, then click Confirm to complete.
Other processes
Printing
Seeing what slips you printed, reprinting slips as needed
Admin > Printing > Printouts Queue
Printouts remain in Alma for 30 days (we can’t control this)
Print queues – how hold slips are printed, when they print
Some libraries will manually print their hold slips, some will use print daemon
If a slip or subset of slips needs to be reprinted, go to Admin > Printing > Printouts Queue and look for “pending” or “printed” jobs, depending on context. Use facets on the left to filter down to the printer.
Course Reserves
Viewing courses and course reserve lists
Fulfillment > Courses > Courses – use facets to narrow down to library, term, etc.
Reserves for a course are on the course “reading list”
Work Orders (do we need to cover here?)
To be determined – lost/missing may be covered here.
Interlibrary loan
New library for ReShare loans - “RES_SHARING”